10 Step-by-Step Rose Drawing Tutorials for Beginners
Roses are probably one of the most classic subjects you can tackle with a pencil and paper. I think almost every artist tries their hand at drawing a rose at some point.
Their layered petals and elegant shapes are both beautiful and a little intimidating. It’s easy to get lost in the details and end up with something that looks more like a cabbage than a flower. I’ve been there, and it can be frustrating.
But drawing roses doesn’t have to be a struggle. It’s about seeing the shapes within the flower and building it up, layer by layer.
To help you get started on your floral art journey, I wanted to share a few tips that have really helped me when drawing flowers.
- Look for basic shapes. Before you even think about petals, try to see the overall shape of the rose. Is it a cup, a cone, or a simple circle? Starting with a light sketch of these foundational shapes gives you a solid structure to build upon. It’s much easier than trying to draw every single petal perfectly from the start.
- Pay attention to the light. Where is the light source hitting your rose? This will determine where your highlights and shadows go. Shadows give a flower depth and make it look three-dimensional. Don’t be afraid to use dark shading inside the folds of the petals to create contrast and make the flower pop.
- Build petals from the inside out. A common mistake is starting with the outer petals. I find it’s much more effective to begin with the small, tightly wound petals in the center. From there, you can work your way outward, adding larger petals that overlap and unfurl. This method helps maintain the natural structure and form of the rose.
Now, let’s explore some wonderful tutorials to help you master this timeless flower. Each section below will guide or video will help you through drawing a different type of rose, so you can practice and find the style that speaks to you.
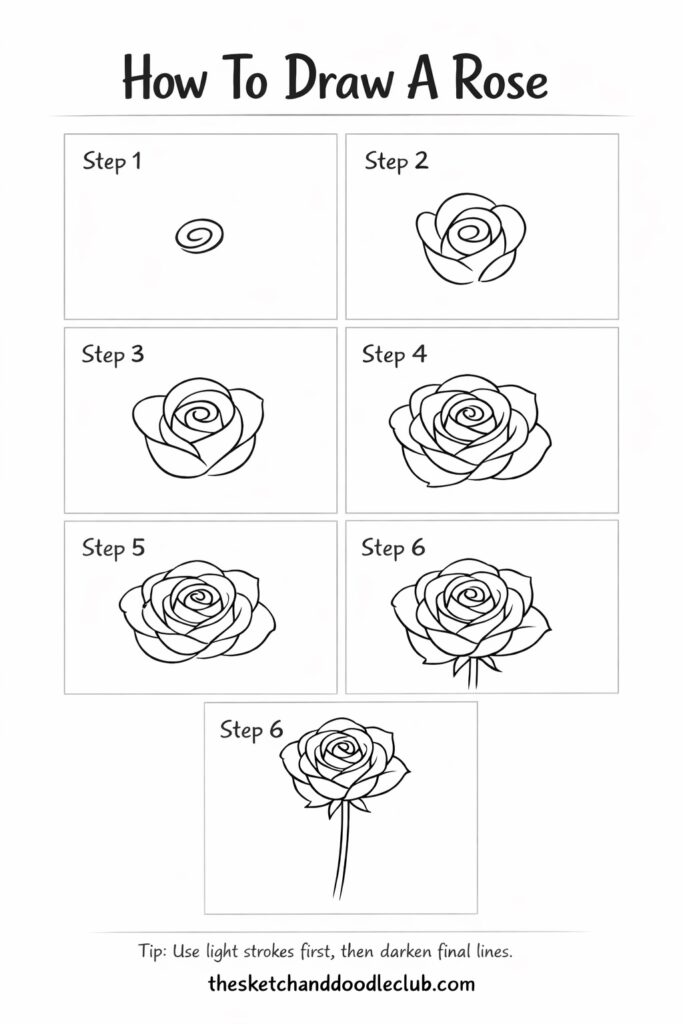
Simple Rose for Beginners
This is the perfect starting point if you’ve never drawn a rose before or just want a quick refresher. This kind of tutorial focuses on breaking down the rose into simple, manageable steps. You’ll learn the basic construction without getting overwhelmed by complex details, resulting in a clean and beautiful flower drawing.
Realistic Rose Drawing
Ready to take your skills to the next level? A realistic rose tutorial dives deep into shading, texture, and light. It’s all about capturing the subtle details—the delicate veins on a petal, the soft shadows within the folds, and the way light reflects off the surface. This is a study in patience, but the stunningly lifelike result is so worth it.
Rose Bud Drawing
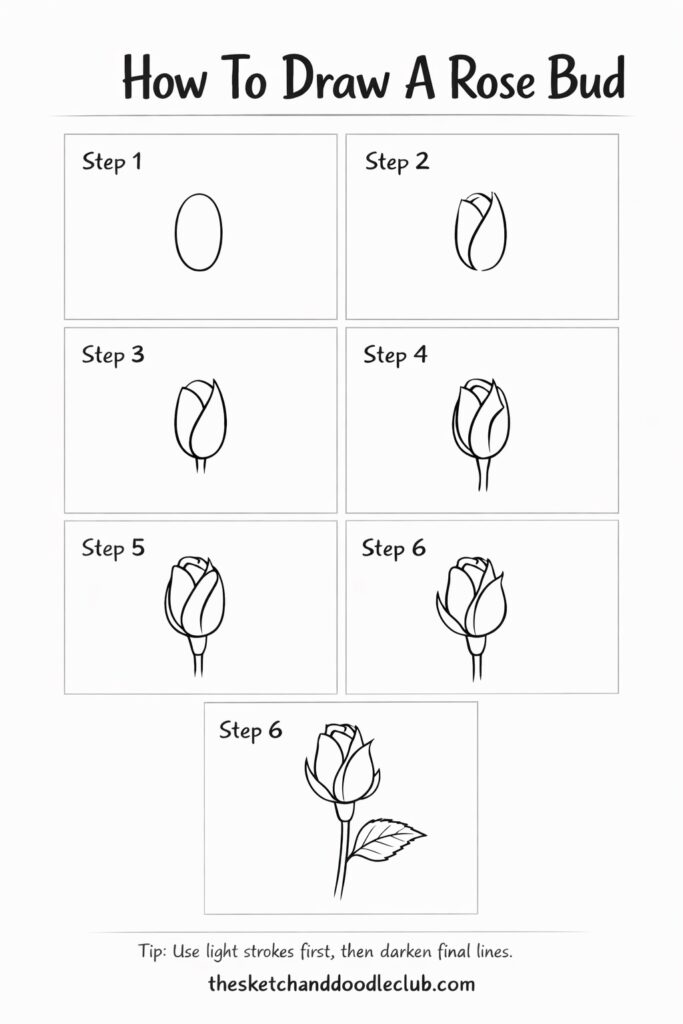
There’s a special kind of beauty in a rose that’s not yet in full bloom. Drawing a rose bud is a great exercise in capturing potential and delicate form. These tutorials often focus on the spiral of the tightly packed petals and the green sepals cradling the flower. It’s a simpler form but just as rewarding to draw.
Open Rose Drawing
An open, fully bloomed rose is a classic for a reason. This is where you can really play with the overlapping layers of petals. A tutorial for an open rose will guide you through creating that sense of depth and fullness, showing you how to draw petals that curl and fold over one another in a natural, organic way.
Roses with a Stems and Leaves
A rose isn’t just the flower; the stem and leaves are part of its character, too. Adding these elements makes your drawing feel more complete. This type of tutorial teaches you how to draw a graceful, stem and how to position the leaves so they look natural and add to the overall composition of your piece.
Roses in a Vase
Placing roses in a vase adds a narrative element to your drawing. It’s no longer just a flower study; it’s a scene. A tutorial like this will not only cover drawing of the roses itself but also how to draw the glass or ceramic vase, paying attention to reflections, highlights, and how the stem looks through water.
Bouquet of Roses
Why draw one rose when you can draw a whole bouquet? This is a fantastic challenge for composition. You’ll learn how to arrange multiple roses so they look like a cohesive group, with some flowers in the foreground and others receding into the background. It’s an exercise in creating depth and managing overlapping shapes.
Rose Tattoo Design
Roses are a staple in tattoo art for their timeless symbolism of love, beauty, and passion. A rose tattoo design tutorial focuses on creating bold lines, dynamic shading, and a stylized look that translates well onto skin. Even if you’re not a tattoo artist, it’s a fun style to explore.
Roses in a Heart Shape
Combining two powerful symbols—the rose and the heart—creates a truly romantic and expressive piece of art. This type of tutorial shows you how to arrange roses and leaves to form a heart shape. It’s a wonderful project for creating a gift, a card, or just a piece of art that’s full of emotion.
Drawing roses takes a bit of practice, but it’s worth it. Pick a tutorial that catches your eye and give it a shot—just have fun with it!